This Durand project replaced failed clay weeping tile with a new interior drainage system and a new submersible sump pump, leaving the exterior walkway and landscaping untouched. It shows how an interior weeping tile replacement runs from the first symptoms to the finished floor, and why an interior system was chosen over exterior excavation on this particular property. If you are facing a similar problem, our weeping tile installation page covers scheduling and fixed pricing.
This walkthrough follows the project in order. For how weeping tile works and what drives the price of replacing it, see our weeping tile cost guide, which covers both in more depth than this case study does.
The Durand Home's Recurring Dampness Problem
The Durand home had a basement that kept getting damp. It was not a single flood but a recurring problem, the kind that returns after heavy rain or snowmelt no matter how often the surface is dried out. Recurring dampness is a useful clue, because it points to a drainage system that is no longer doing its job rather than a one-off leak.
The first step was working out why. Dampness that returns along the base of the walls usually means groundwater is reaching the foundation and has nowhere to go, and in a home of this age the weeping tile is the first thing to check. A site assessment looks at where the moisture shows up and whether the original drainage is still functioning at all.
Dampness that keeps coming back is a drainage symptom, not a surface one. Drying and repainting treats the stain while the cause keeps sending more water to the same place.
What the Old Clay Weeping Tile Looked Like Once Exposed
Once the old system was exposed, the problem was clear. The original clay tile sections had shifted and partially collapsed over the decades, leaving gaps where groundwater bypassed the system entirely and pooled against the foundation instead of being carried away. A weeping tile run only works as a continuous path, so a few collapsed or displaced sections are enough to defeat the whole line.
That is the failure mode of older clay systems in general. Short rigid segments laid with open joints are vulnerable to movement in the soil around them, and once the alignment is lost, water takes the easier route past the pipe rather than into it. The Durand tile was not blocked so much as broken, which is why simply flushing it would not have restored the drainage.
Interior Weeping Tile and Sump Pit Installation
An interior system was chosen over exterior excavation. The home's landscaping and a finished exterior walkway would have made digging around the outside of the foundation disruptive and costly, while an interior system solves the same drainage problem with far less impact on the property. For a deeper look at how that interior approach works, our no-dig interior drainage guide covers the method.
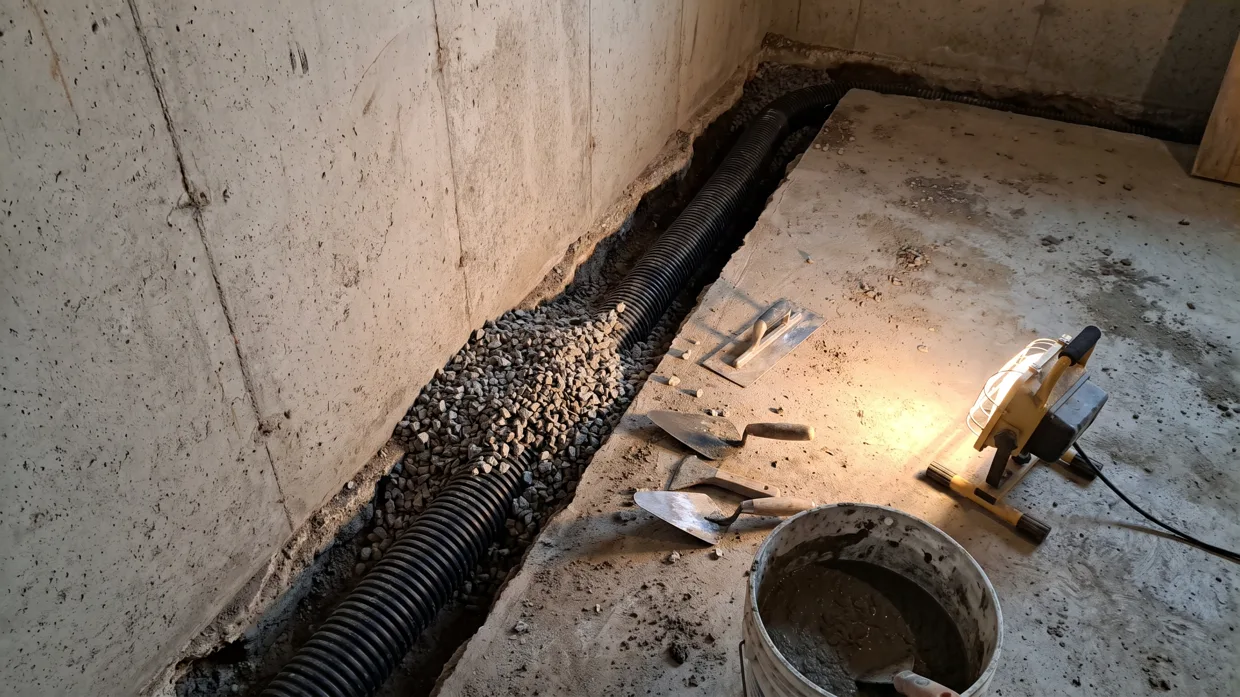
The work started with a narrow channel cut around the basement perimeter. New perforated pipe was laid in the channel on a gravel bed, positioned to collect water at the footing and carry it to a sump pit. A new submersible sump pump and pit were installed as part of the same project, to give the new weeping tile somewhere to drain, since a collection line with no pump at the end of it is only half a system.
Why the Interior Approach Fit This Property
Choosing between interior and exterior replacement is a property decision, not a preference. Exterior excavation addresses the water at the footing before it reaches the wall, which is the more thorough approach, but it means opening the ground around the whole foundation. On a property with a finished walkway and established landscaping, that adds restoration cost and disruption that have nothing to do with the drainage itself.
An interior system trades that for a different set of conditions. The work happens inside, the exterior stays as it is, and the schedule is less dependent on weather and ground conditions. The homeowner's priorities decide which tradeoff is worth making, and on this project the walkway and landscaping tipped it toward the interior. A homeowner without those constraints might reasonably choose differently, which is why the assessment lays out both options.
Floor Patching and Cleanup
Once the pipe and pit were in, the channel was backfilled with gravel and patched with concrete to match the existing slab. Only that narrow strip around the perimeter was affected, and the rest of the basement floor was left untouched, which keeps the disruption to a short, contained phase of the project.
| Phase | What Happened | Why It Matters |
|---|---|---|
| Assessment | Recurring dampness traced to the drainage system | Confirms the cause before any work is priced |
| Exposure | Old clay tile found shifted and partly collapsed | Shows why the original system had stopped working |
| Approach | Interior system chosen over exterior excavation | Protects the walkway and landscaping |
| Installation | New perimeter pipe, new submersible pump and pit | Gives the new drainage somewhere to send water |
| Finishing | Channel backfilled and patched to match the slab | Leaves the rest of the floor untouched |
Work like this is planned against Ontario Building Code requirements and City of Hamilton permit requirements, which a contractor should confirm before digging rather than after. Cleanup followed the patching, leaving the basement ready to use again.
The Basement Through the Following Spring
The real test of any drainage work is the next wet season. For the Durand home that was the following spring thaw, the first wet season after the work was completed, and the basement stayed dry through it. That is the result that matters, because spring thaw is when groundwater and runoff peak and when a failing system shows itself.
It also reflects how the pieces work together: the new tile collects water at the footing, the pit holds it, and the pump moves it out. Our spring flooding prevention guide covers the seasonal checks that keep a system like this working, including testing the pump before the thaw rather than after it.
What a Site Assessment Confirms Before Any Digging
A site assessment is what makes a project like this predictable. It confirms where the moisture is entering, whether the existing drainage is intact, collapsed, or missing, and whether an interior or exterior approach suits the property. On the Durand home, the finished exterior walkway was a deciding factor, and that kind of site detail only shows up when someone walks the property.
It also settles the scope: the route of the perimeter channel, the pit location, and where the pump discharges. BaseWorks quotes the whole scope fixed-price after the assessment, so the number covers the pipe, the pit, the pump, and the patching rather than adding items once the floor is open.
What This Project Shows About Weeping Tile Replacement
Replacing failed weeping tile does not have to mean digging up the yard. Where landscaping or hardscaping makes exterior excavation impractical, an interior system can solve the same drainage problem with a contained job inside the basement. The tradeoff is that it manages water at the foundation wall rather than before it reaches the wall, which is why the choice is made per property.
It also shows why the pump is part of the project rather than an optional extra. New tile with no way to move the water it collects does not solve anything, so the pit and pump went in with the pipe, as one system.
Quick Checklist Before You Call
Frequently Asked Questions
The original clay tile sections had shifted and partially collapsed over decades, leaving gaps where groundwater bypassed the system entirely and pooled against the foundation.
The home's landscaping and a finished exterior walkway made exterior excavation disruptive and costly, while an interior system solved the same drainage problem with less impact on the property.
A narrow channel around the basement perimeter was cut and later patched to match the existing slab, leaving the rest of the floor untouched.
Yes, a new submersible sump pump and pit were installed as part of the same project to give the new weeping tile somewhere to drain.
The basement stayed dry through the following spring thaw, which was the first wet season test after the work was completed.